In the harrowing world of Resident Evil Requiem (RE9), survival hinges on every resource you can scavenge. Among the myriad challenges and grotesque foes, finding and cracking safes often presents a critical opportunity to bolster your inventory with much-needed items. One such vital puzzle is the RE9 Monitor Control Room Safe. This guide delves deep into its location, the elusive codes you'll need, its precious contents, and crucial tips to ensure you don't miss out on its rewards.
For players embodying Grace, accessing this particular safe within the terrifying environments of RE9 is a must-do. It's not merely an optional side-quest; the items within can significantly impact your journey, providing a much-needed edge against the horrors that lurk around every corner. Understanding the mechanics behind opening these safes, especially when difficulty settings alter the solutions, is paramount for any seasoned survivor.
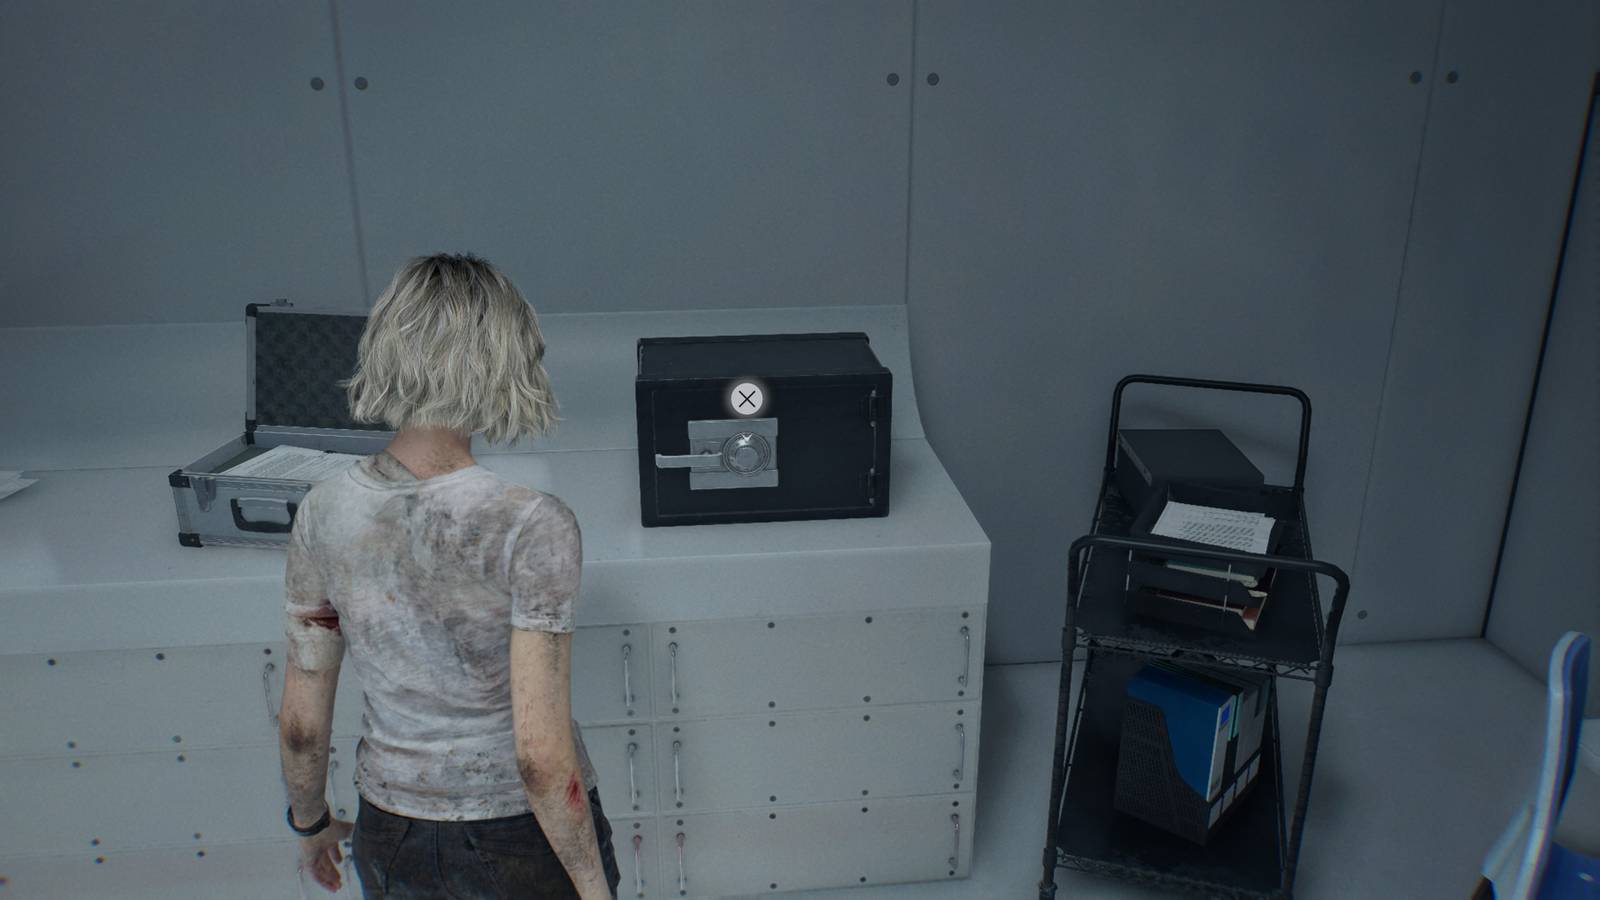
Locating the RE9 Monitor Control Room Safe
Finding the RE9 Monitor Control Room Safe is half the battle, and thankfully, its placement is relatively straightforward once you reach the correct sector. Players will discover this crucial safe nestled within the ARK, a significant area in Resident Evil Requiem. Specifically, look for it conveniently situated right beside one of the game's invaluable save points. This strategic positioning means you can secure your progress immediately after acquiring the safe's contents, minimizing the risk of losing your hard-earned gains.
While the immediate vicinity of the safe itself is generally free of direct enemy encounters – offering a brief respite from the relentless pursuit of the infected – the path to discovering its solution is anything but peaceful. To gather the necessary clues for cracking this particular safe, you'll need to brave encounters with some of Resident Evil's most iconic and terrifying creatures: the Lickers. These agile and deadly monstrosities will challenge your combat skills and resource management. Therefore, while the safe's location is safe, the journey to its intelligence is fraught with peril. Always be prepared for a fight, even when you're on a purely investigative mission to find documents or clues.
Cracking the Code: Difficulty-Specific Solutions
Resident Evil Requiem, true to its survival horror roots, offers varying levels of challenge, and this extends directly to the solutions for its in-game puzzles, including safes. The RE9 Monitor Control Room Safe is a prime example of this, as its combination changes based on the difficulty setting you choose. This adds replayability and ensures that even veteran players will need to stay on their toes when tackling higher difficulties.
- Casual & Standard (Modern/Classic) Difficulty: For players navigating the game on these more accessible settings, the code remains consistent. To unlock the safe, follow these precise steps:
- Turn the knob towards the left until it reaches 50.
- Next, turn the knob towards the right until it aligns with 60.
- Finally, turn the knob towards the left one last time until it lands on 80.
- Insanity Difficulty: For those seeking the ultimate challenge, the Insanity difficulty presents a unique set of puzzles and increased enemy prowess. The code for the RE9 Monitor Control Room Safe on this difficulty is distinct and, as is often the case with such high-tier solutions, may be discovered and shared by the dedicated Resident Evil community shortly after the game's release. If you're playing on Insanity, be prepared for a different combination, and keep an eye on community resources or in-game clues that might guide you to this more elusive solution.
It's crucial to pay attention to your current difficulty setting before attempting to input a code. Using the wrong combination will simply reset the safe, costing you precious time and potentially exposing you to further danger if you're attempting it under pressure. Understanding these variations is a key aspect of mastering RE9's intricate gameplay.
The Essential Contents of the Monitor Control Room Safe
Why go through the trouble of battling Lickers and deciphering cryptic codes for the RE9 Monitor Control Room Safe? The answer lies in its contents – a carefully curated selection of items designed to give you a critical advantage in your fight for survival. Unlike some safes that might offer less impactful resources, this particular cache provides genuinely game-changing items:
- 1 x Bottle of Acid: A versatile and highly sought-after crafting component. Acid is often used to create powerful ammunition or potent chemical solutions, invaluable for dealing with the more resilient and mutated threats you'll encounter. Having an extra bottle can mean the difference between crafting a necessary explosive round or being forced to flee a fight.
- 1 x Empty Bottle: While seemingly innocuous, an empty bottle in Resident Evil Requiem is a blank canvas for survival. These can be combined with various chemicals to create healing tinctures, incendiary devices, or other crucial items. An extra empty bottle expands your carrying capacity for craftable solutions, allowing you to adapt to diverse combat scenarios without constantly searching for base components.
- 1 x Med Injector: This is arguably the most immediately impactful item you'll find. A Med Injector provides a significant boost to your health, often fully restoring it or bringing you back from the brink of death. In a game where health resources are scarce and every hit counts, an additional Med Injector can be a literal lifesaver, allowing you to endure tough boss fights or recover from unexpected ambushes.
These items aren't just "goodies"; they are foundational elements of survival in RE9. The Bottle of Acid fuels your offensive capabilities, the Empty Bottle enhances your versatility, and the Med Injector ensures your resilience. Missing out on the RE9 Monitor Control Room Safe means foregoing these critical advantages, potentially making subsequent sections of the game significantly harder. For further guidance on securing these vital resources, don't miss this related article: Don't Miss RE9's Monitor Control Room Safe: Get Key Items.
General Safe Mechanics and Strategic Advice
The RE9 Monitor Control Room Safe is just one example of the mini-puzzles Resident Evil Requiem integrates into its survival horror experience. Safes across the game serve as optional challenges that reward diligent exploration and keen observation. Here are some overarching tips and analysis to help you conquer not just this safe, but others you might encounter:
The Puzzle Element and Clue Hunting
Safes in Resident Evil Requiem are rarely opened by blind luck. Instead, they require you to actively search for clues scattered throughout the environment. These clues often come in the form of documents, notes, or even subtle environmental details that hint at the combination. For the Monitor Control Room Safe, specifically, remember that obtaining these clues might involve facing significant threats, like the aforementioned Lickers. Therefore, prepare for combat even when you're primarily on a reconnaissance mission.
Always make it a habit to:
- Thoroughly search every room: Don't just rush through. Examine desks, shelves, and walls for any interactable items or legible text.
- Read all documents: Even seemingly mundane notes can contain vital information. Pay close attention to numbers, dates, or highlighted phrases.
- Connect the dots: Sometimes, the clues aren't in a single document but require you to piece together information from multiple sources.
The Missable Danger: Act Now or Forever Hold Your Peace
One of the most critical pieces of advice regarding safes in RE9, and indeed many Resident Evil titles, is their "missable" nature. Once you proceed past certain trigger points in the game's narrative or enter new major areas, you might find yourself unable to backtrack to previous locations. This means that if you haven't opened the RE9 Monitor Control Room Safe before moving on, you could permanently lose the opportunity to acquire its contents. This adds a layer of urgency to the puzzle-solving aspect.
Actionable Advice: Prioritize opening safes as soon as you discover them or acquire their codes. If you find a safe but not its code, make a mental note or mark it on your map if the game allows. It's often safer to backtrack for a code than to push forward and risk missing the safe entirely. For a comprehensive guide on all codes, refer to: Resident Evil Requiem: Unlock Monitor Control Room Safe Codes.
Control Rooms: A Hub of Vitality (In-Game and Real World)
It's interesting to note the name: "Monitor Control Room." In many real-world critical infrastructure scenarios, control rooms are nerve centers – places where vital systems are monitored, managed, and upgraded. Think of the Tyne and Wear Metro control room, for instance, undergoing multi-million-pound upgrades to improve efficiency and reduce disruption for passengers. While the context is entirely different, the *concept* of a control room as a place of crucial importance, housing vital data or equipment, resonates within the game. The safe in the Monitor Control Room isn't just a random container; it's thematically appropriate that such a central hub would guard critical resources essential for ongoing operations – or, in Grace's case, essential for survival.
This thematic connection underscores why the items within the RE9 Monitor Control Room Safe are so valuable. They represent the kind of critical components or immediate remedies that would be stored in a place designed to oversee and manage vital functions, even if those functions in RE9 have devolved into pure survival.
Conclusion
The RE9 Monitor Control Room Safe is far more than just another optional side objective; it's a strategic checkpoint in your Resident Evil Requiem journey. From its key location near a save point in the ARK, through the Licker-infested path to its clues, and finally to its difficulty-dependent codes, every aspect of this safe is designed to test your resourcefulness. The Bottle of Acid, Empty Bottle, and Med Injector it contains are not mere trinkets but essential tools that will significantly aid your survival against RE9's relentless horrors. Remember to always search meticulously, prioritize safe openings before advancing too far, and adapt your approach based on your chosen difficulty. By following this comprehensive guide, you'll ensure that you successfully unlock this critical asset and give yourself the best possible chance to navigate the terrifying world of Resident Evil Requiem.